Creating Jenkins Nodes using Temporary Spot Instances in AWS
Introduction
Most of the time, jenkins jobs executions takes planes by default at master’s node, this means the same instance that is running jenkins. For practical purposes this is ok, but what if you are part of a large team of developers and there are many projects being deployed at the same time?
This is the scenario for more than 2 jobs running at the same time and requiring extra capacity each time.
Also, AWS as you already know, have SPOT INSTANCES that runs at a lower price and we can use them to run jobs and terminate those instances after the job gets completed.
Steps for this task
I’m making the assumption that you already have a jenkins server already set up in AWS.
For this challenge, we will perform the following tasks:
- AWS Launch Template and Spot Fleet creation.
- Install and configure Cloud Node plugin in Jenkins.
- Jenkinsfile or Jenkins Job adaptation.
AWS Launch Template and Spot Fleet creation.
I strongly recommend that before creating a launch template, you first create an AWS AMI Image with your project (jobs) needs instead of using User data in the following steps.
Here we are going to use a general Ubuntu AMI.
 Launch Template
The important items to be filled in will be:
- Name and description
- AMI to use – (I Recommend your own AMI with all software pre-installed) Mostly common Ubuntu 22
- Type of instance to use – Select based on your performance needs
- Key Pair – This is important because you will need this Key Pair in Main Jenkins in order to connect to it
- Network – Select the same as Jenkins Master
- Security Group – Create or select one with port 22 enabled for Jenkins Master
- Storage – Allocate enough storage according to your needs
- User data (optional if using own AMI) – For the Jenkins worker to run on the subordinate node, we will need to install JRE, we also installed Docker as a requirement:
User data (Optinal if using own AMI):
1
2
3
4
5
6
7
8
9
10
11
12
13
14
15
16
17
18
19
#!/bin/bash
# Install docker
apt-get update
apt-get install -y apt-transport-https ca-certificates curl software-properties-common
curl -fsSL https://download.docker.com/linux/ubuntu/gpg | sudo apt-key add -
add-apt-repository \
   "deb [arch=amd64] https://download.docker.com/linux/ubuntu \
   $(lsb_release -cs) \
   stable"
apt-get update
apt-get install -y docker-ce
usermod -aG docker ubuntu

# Install docker-compose
curl -L https://github.com/docker/compose/releases/download/1.21.0/docker-compose-$(uname -s)-$(uname -m) -o /usr/local/bin/docker-compose
chmod +x /usr/local/bin/docker-compose

#Install JRE, JQ and AWS Cli
sudo apt install -y default-jre jq aws-cli
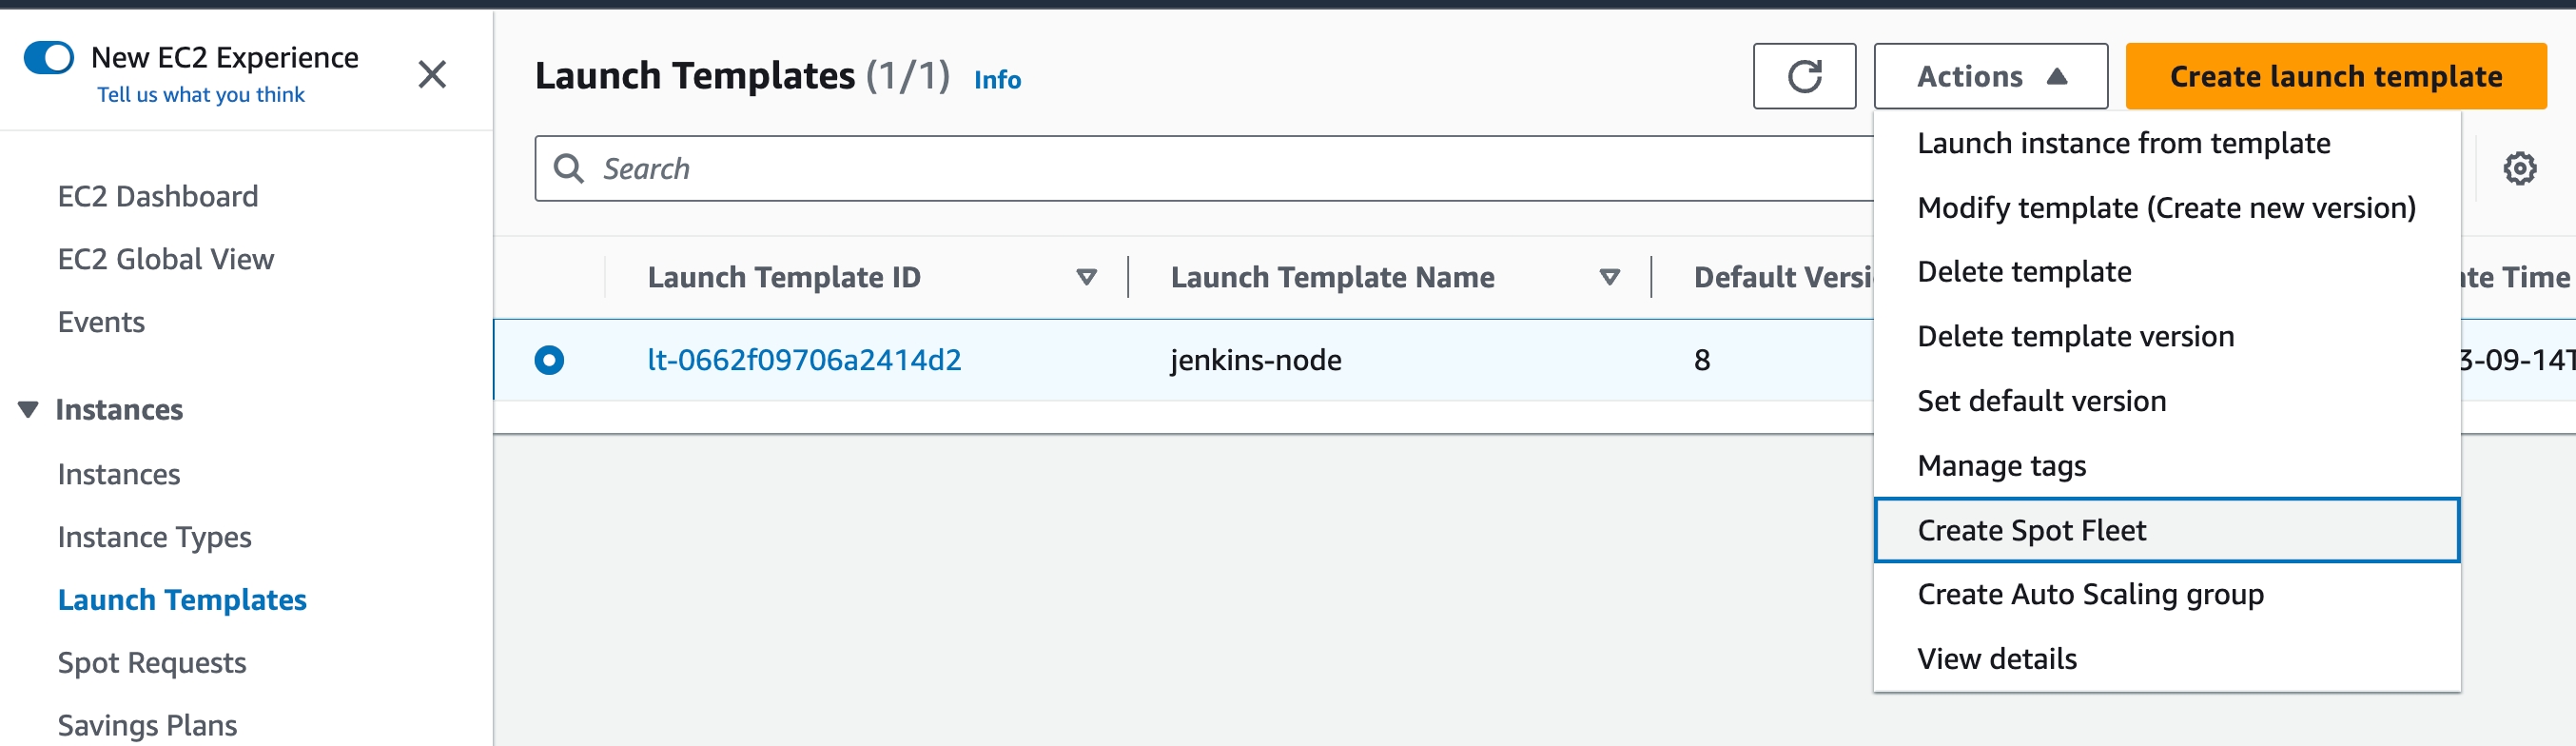
Create an AWS Spot Fleet
Now let’s create a spot fleet with the following instructions:
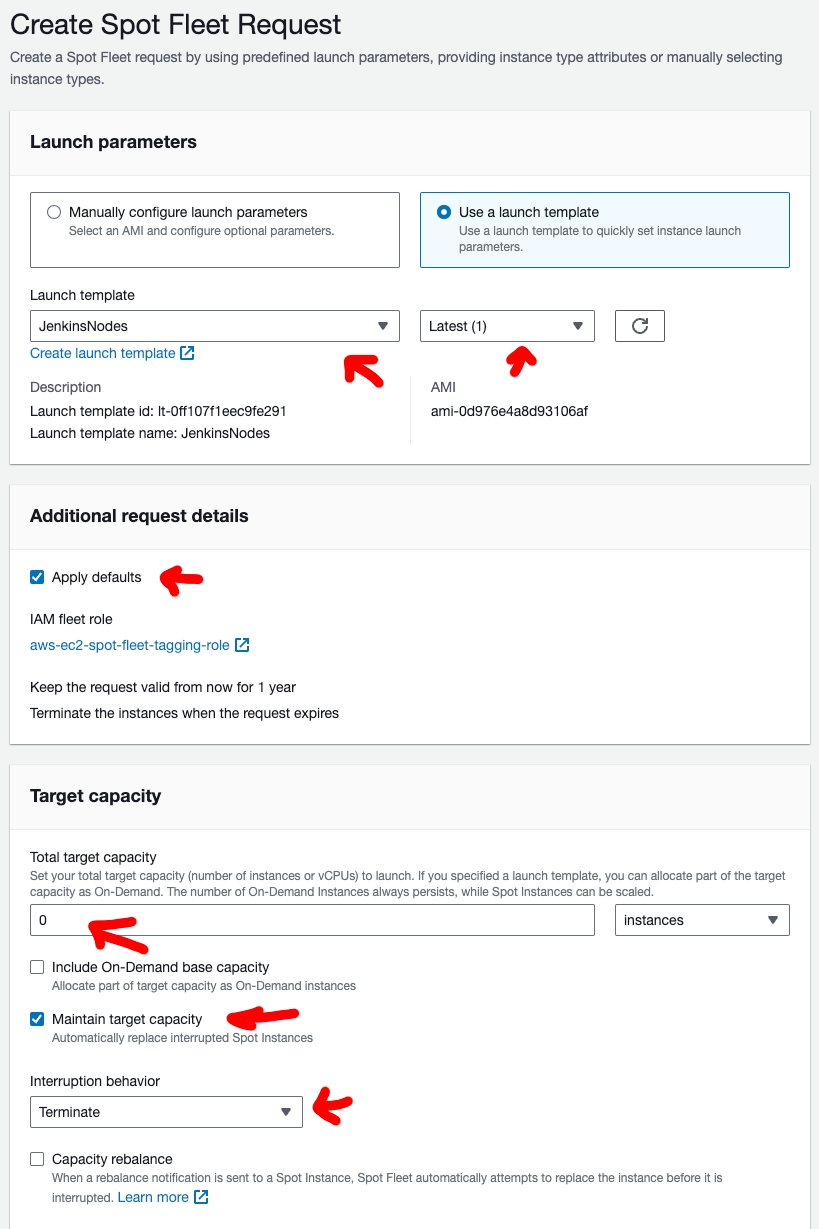
 Creating Spot Fleet
In the creation of the spot fleet, make sure you are selecting the launch template that you’ve created and it is important to select target capacity to 0 because later on in Jenkins we will controll this section and select Mantain target capacity with Interruption behavior to Terminate
 Creating Spot Fleet
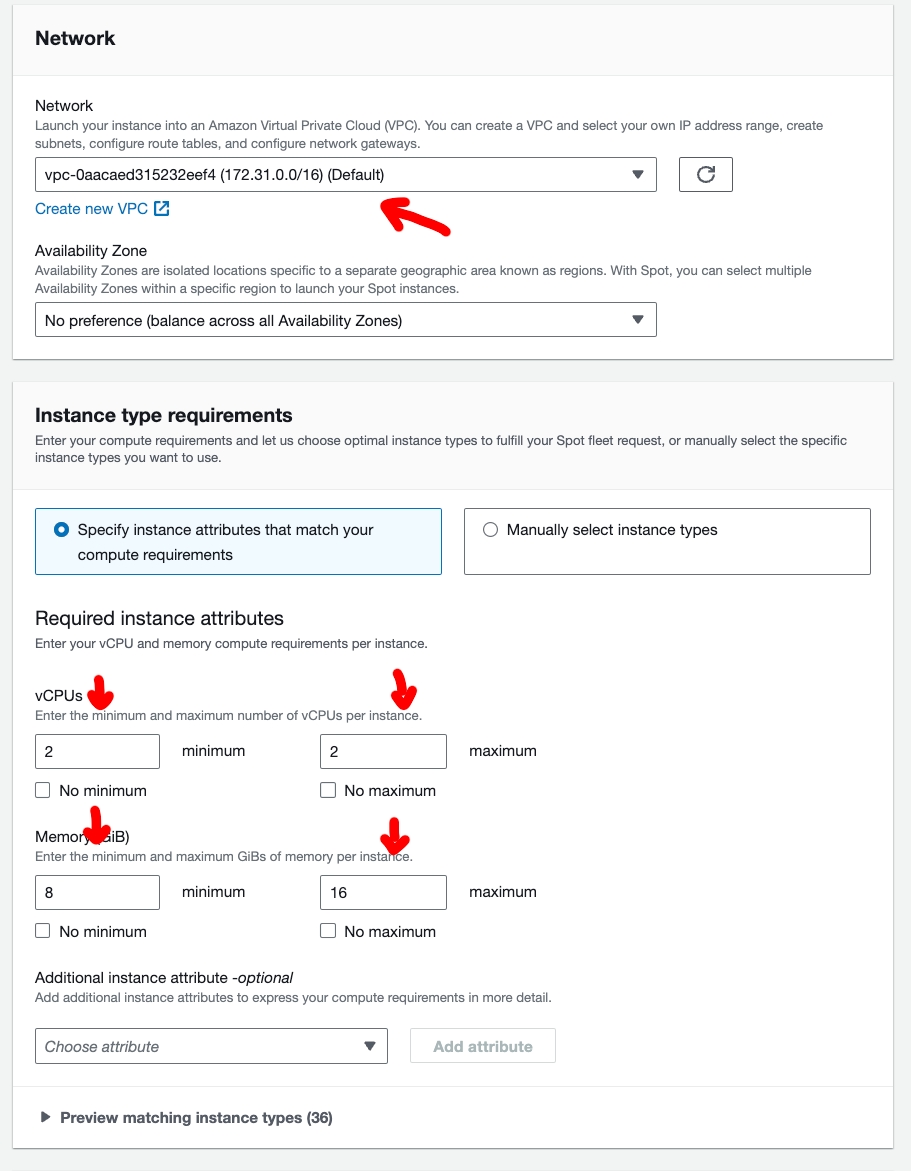
Also remember to select the same network as the Jenkin’s master node. Under instance type is up to you what are your pipelines/jobs needs, I feel comfortable selecting hardware requierments instead of instance types.
 Creating Spot Fleet
By now we already have the launch template and spot fleet fulfilled, but we are still missing some more actions in AWS in order to proceed to configure Jenkins properly.
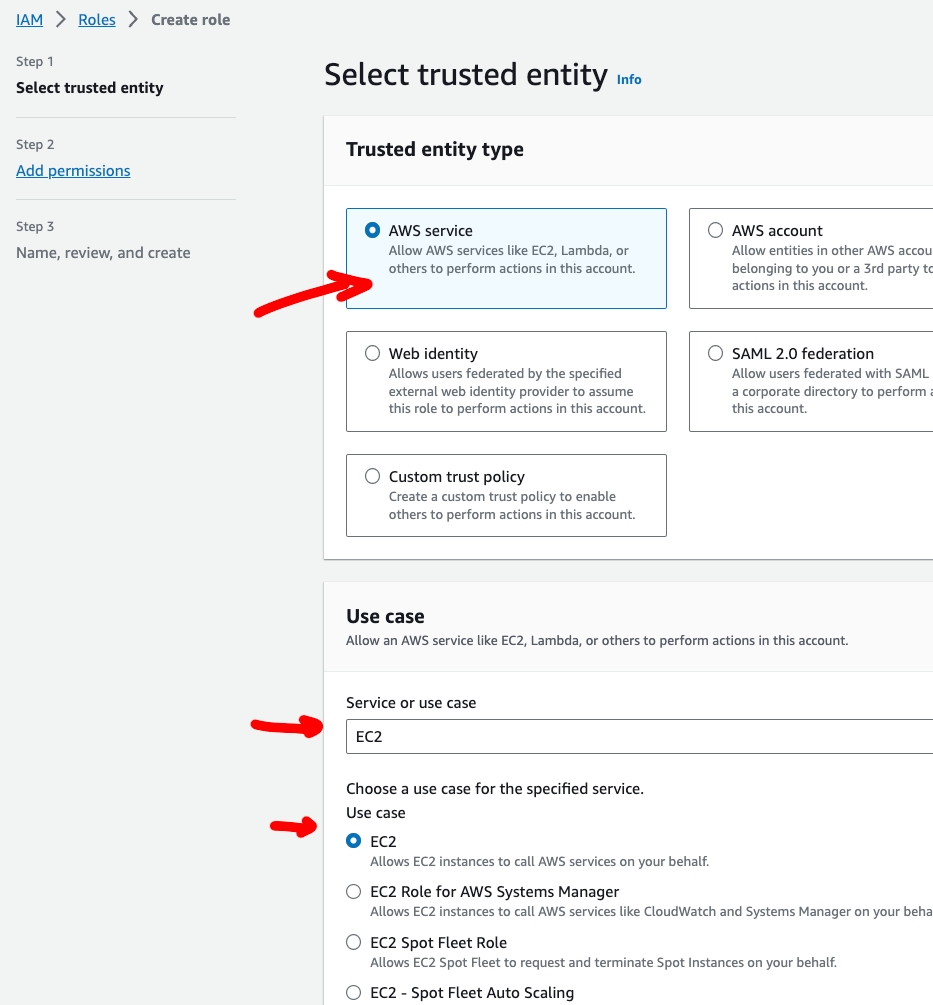
Create a new IAM Policy and Role for Jenkins instance to allow managning the spot fleet you’ve just created
First create the new policy and name it jenkins-spot-fleet
1
2
3
4
5
6
7
8
9
10
11
12
13
14
15
16
17
18
19
20
21
22
23
24
25
26
27
28
29
30
31
32
33
34
35
36
{
   "Version":"2012-10-17",
   "Statement":[
      {
         "Effect":"Allow",
         "Action":[
            "ec2:DescribeSpotFleetInstances",
            "ec2:ModifySpotFleetRequest",
            "ec2:CreateTags",
            "ec2:DescribeRegions",
            "ec2:DescribeInstances",
            "ec2:TerminateInstances",
            "ec2:DescribeInstanceStatus",
            "ec2:DescribeSpotFleetRequests"
         ],
         "Resource":"*"
      },
      {
         "Effect":"Allow",
         "Action":[
            "autoscaling:DescribeAutoScalingGroups",
            "autoscaling:UpdateAutoScalingGroup"
         ],
         "Resource":"*"
      },
      {
         "Effect":"Allow",
         "Action":[
            "iam:ListInstanceProfiles",
            "iam:ListRoles",
            "iam:PassRole"
         ],
         "Resource":"*"
      }
   ]
}
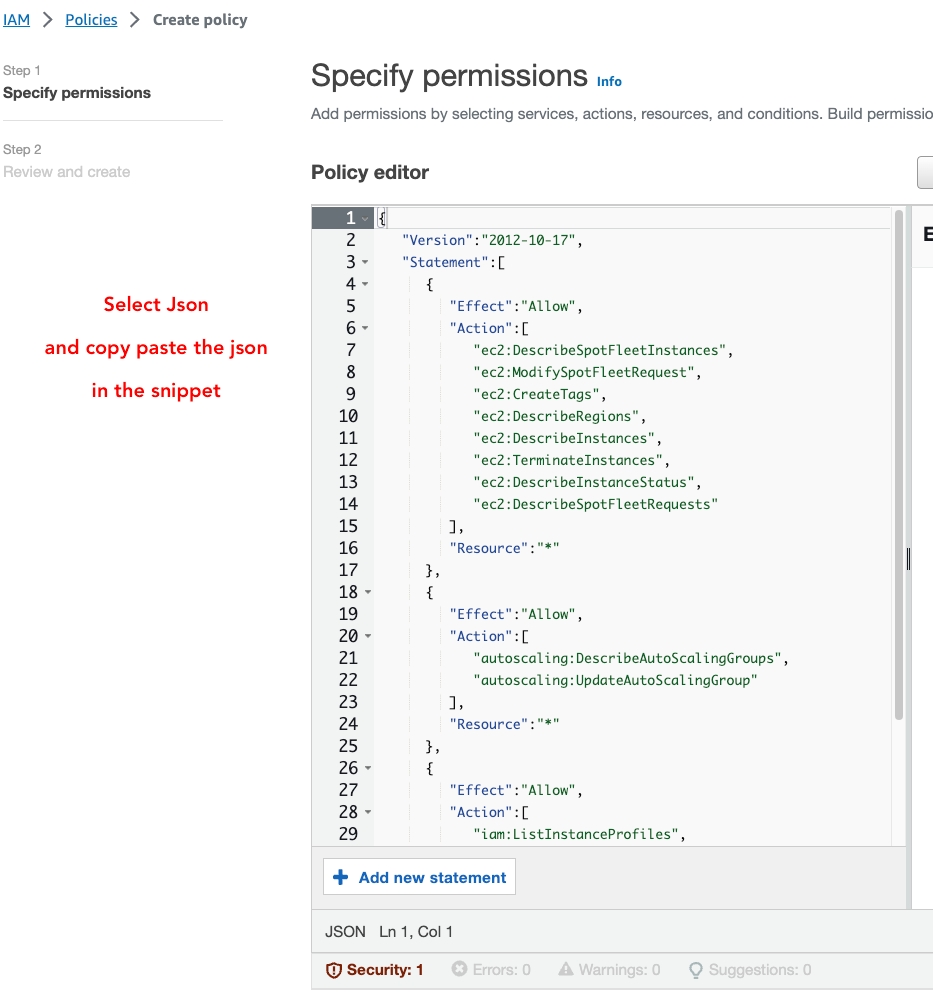 Creating a new policy for Jenkins
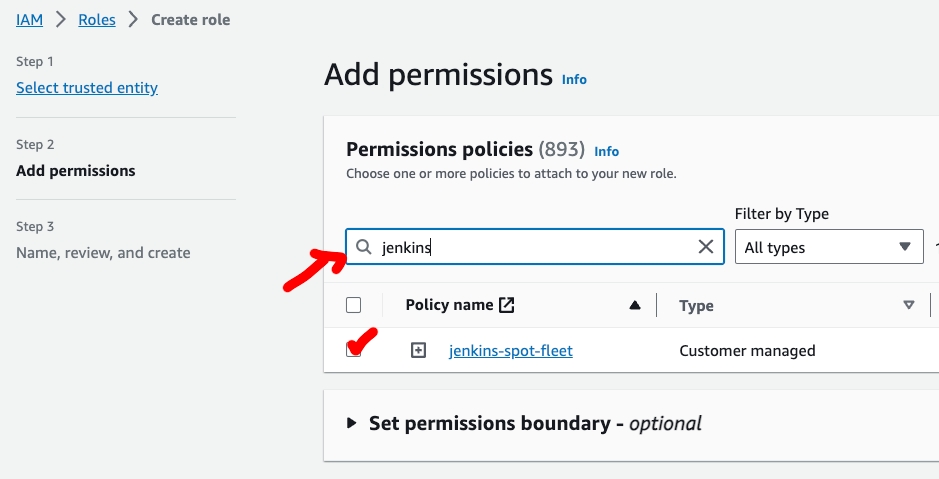
Now lets create a role jenkins-spot-fleet-manager and assign the policy jenkins-spot-fleet
 Creating a new Role for Jenkins Spot Fleet Manager
Assign permission jenkins-spot-fleet
 Creating a new Role for Jenkins Spot Fleet Manager2
Finally assign that role to your Jenkis Master
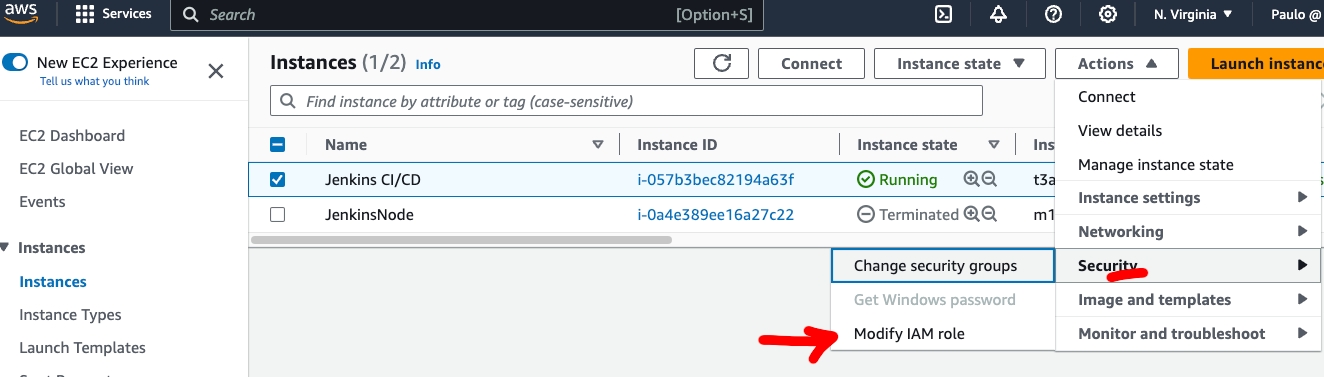 Assign IAM Role to Jenkins
Install and configure Cloud Node plugin in Jenkins.
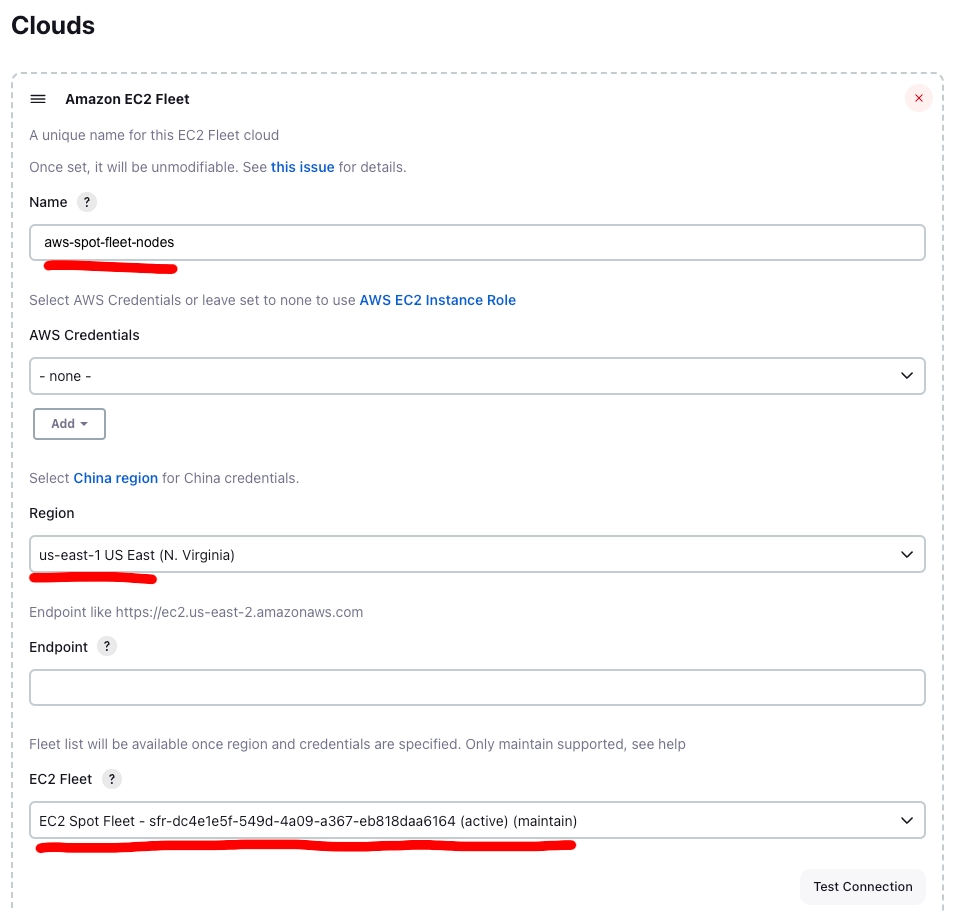
It’s time to go to your Jenkins URL and install ec2-fleet-plugin and configure it from Manage Jenkins > Manage Nodes > Configure Clouds > Add New Cloud > Amazon EC2 Fleet.
 Setup Jenkins EC2 Spot Fleet Plugin
Name this spot fleet setup what ever you want, select the region that the spot fleet its located, after that, it will show the EC2 fleet that you already setup in AWS. Keep in mind that we do not need to fill AWS Credentials because we created and assigned the IAM Role to that Jenins instance.
 Setup Jenkins EC2 Spot Fleet Plugin
Here is an interesting part, remember when configuring the launch template we needed an Key Pair?, well here we need to create a Jenkins credential for that Key Pair and add it before creating this EC2 Spot Fleet Cloud Node. Also the network like before in the same subnet or vpc so it can use internal IP for faster connection and no bandwidth consumed.
 Setup Jenkins EC2 Spot Fleet Plugin
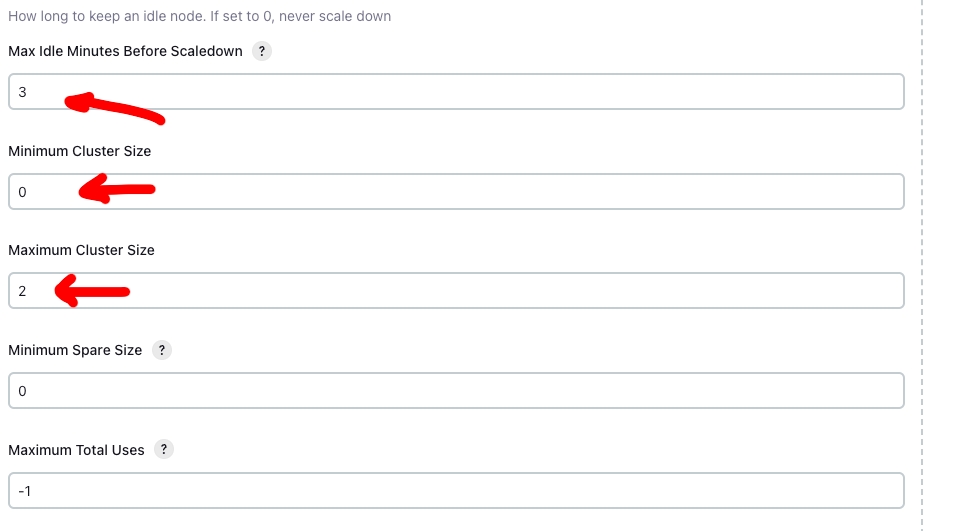
Last for setting up you EC2 Spot Fleet, define how many minutes of timeout before killing the instance. Also maximun and minimum cluster instances size, this depends on your needs. Max Idle Minutes Before Scaledown – The number of minutes Jenkins will keep an instance active with no pending tasks. If left at 0 Jenkins will never terminate instances, even if they are unused
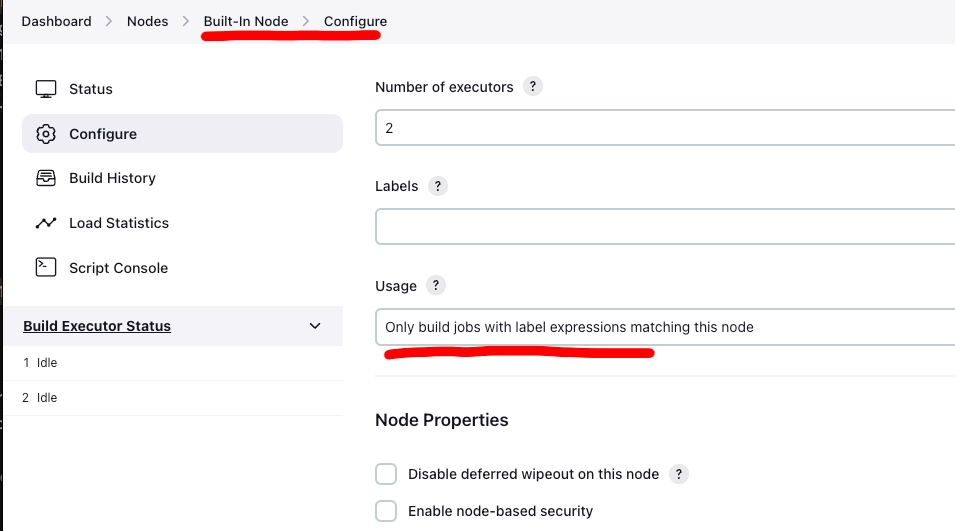 Disable nodes in Jenkins Master
Finally, change the Jenkis Master node from “User this node as much as possible” to Only build jobs with label expression matching this node for the Master instance stop accepting your current jobs
And thats it! now you are ready to start building your jobs in a spot instance at a low cost. :wink:
I Hope you have enjoyed this post and if it is useful to you please invite me a coffee to keep posting more…